Dolby Atmos in Logic Pro: Setup, Binaural Monitoring and Export
Set up a native Dolby Atmos project in Logic Pro, route beds and objects correctly, check binaural translation and export the ADM BWF master.

If you want to mix Dolby Atmos in Logic Pro, start the project at 48 or 96 kHz, enable Dolby Atmos in the Audio project settings, keep the 7.1.2 bed unless the delivery plan calls for another format, then decide which signals belong in the bed and which deserve object routing. Monitor through the renderer your listener will actually use. When the mix is approved, export an ADM BWF master; a normal bounce is only a channel-based reference.
That last distinction prevents the most expensive mistake in this workflow. Logic can make a binaural file that sounds immersive on headphones, but that two-channel file does not carry the separate objects and pan metadata required for Atmos delivery.
Set the project up before you start moving sounds
Atmos is easier when it is part of the session plan, not a late conversion. Apple’s current guide says Spatial Audio projects support native 48 and 96 kHz sample rates. Logic can convert 44.1 or 88.2 kHz projects in real time, but that adds work during rendering. My default for a music project is 48 kHz unless the production has a clear reason to stay at 96 kHz. Set the rate before recording or importing audio: Apple warns that changing the project sample rate later can leave audio files mismatched or playing incorrectly. If this is an existing session, make a copy before changing its settings and check the imported files against the new rate.
Save a new version of the project before changing its spatial format. Keep the stereo mix path available as a comparison and as a separate delivery route. An Atmos master does not replace a carefully checked stereo master.
- Open File → Project Settings → Audio.
- Set the project sample rate to 48 kHz or 96 kHz.
- Choose Dolby Atmos from the Spatial Audio menu.
- Confirm the surround bed format. Logic uses 7.1.2 by default; 7.1 and 5.1 are also available.
- Enabling Dolby Atmos automatically sets the project frame rate to 24 fps, the required rate for an Atmos music mix. Check it under File → Project Settings → Synchronization → General.
Enabling Atmos inserts the Dolby Atmos plug-in on the surround master automatically. Apple notes that the plug-in is created through the project setting rather than chosen from the ordinary plug-in menu. If you cannot find it in the insert list, that is usually the reason.
Choose beds and objects by signal role
A Logic Pro Atmos mix has one surround bed plus separate objects. The bed works like a channel-based surround bus. Objects keep their audio and position metadata separate until the renderer turns the mix into a speaker or headphone format.
Use the bed for material that behaves as a stable foundation: drums assembled through shared buses, room returns, broad keyboards, backing layers, or effects that need conventional surround routing. Use objects when a mono or stereo signal needs independent three-dimensional position, height, movement or renderer-aware placement.
Bed track
Channel format
Mono, stereo or surround
Panner
Surround Panner
Signal path
Surround bus → surround master → Dolby Atmos
Master inserts before Atmos
Processed by them
Direct LFE control
Available through the Surround Panner
Best use
Stable foundation and shared surround processing
Object track
Channel format
Mono or stereo
Panner
3D Object Panner
Signal path
Directly to an object input in Dolby Atmos
Master inserts before Atmos
Bypasses them
Direct LFE control
Not available directly
Best use
Independent position, height and movement
Logic creates new tracks as bed tracks. To make a track an object, click its Output slot and choose 3D Object Panner. The Output label changes from Surround to Object. Apple’s bed and object routing reference also confirms that a stereo object consumes two object inputs and that surround tracks cannot become objects. If the source format itself is unclear, settle the mono-versus-stereo track decision first.
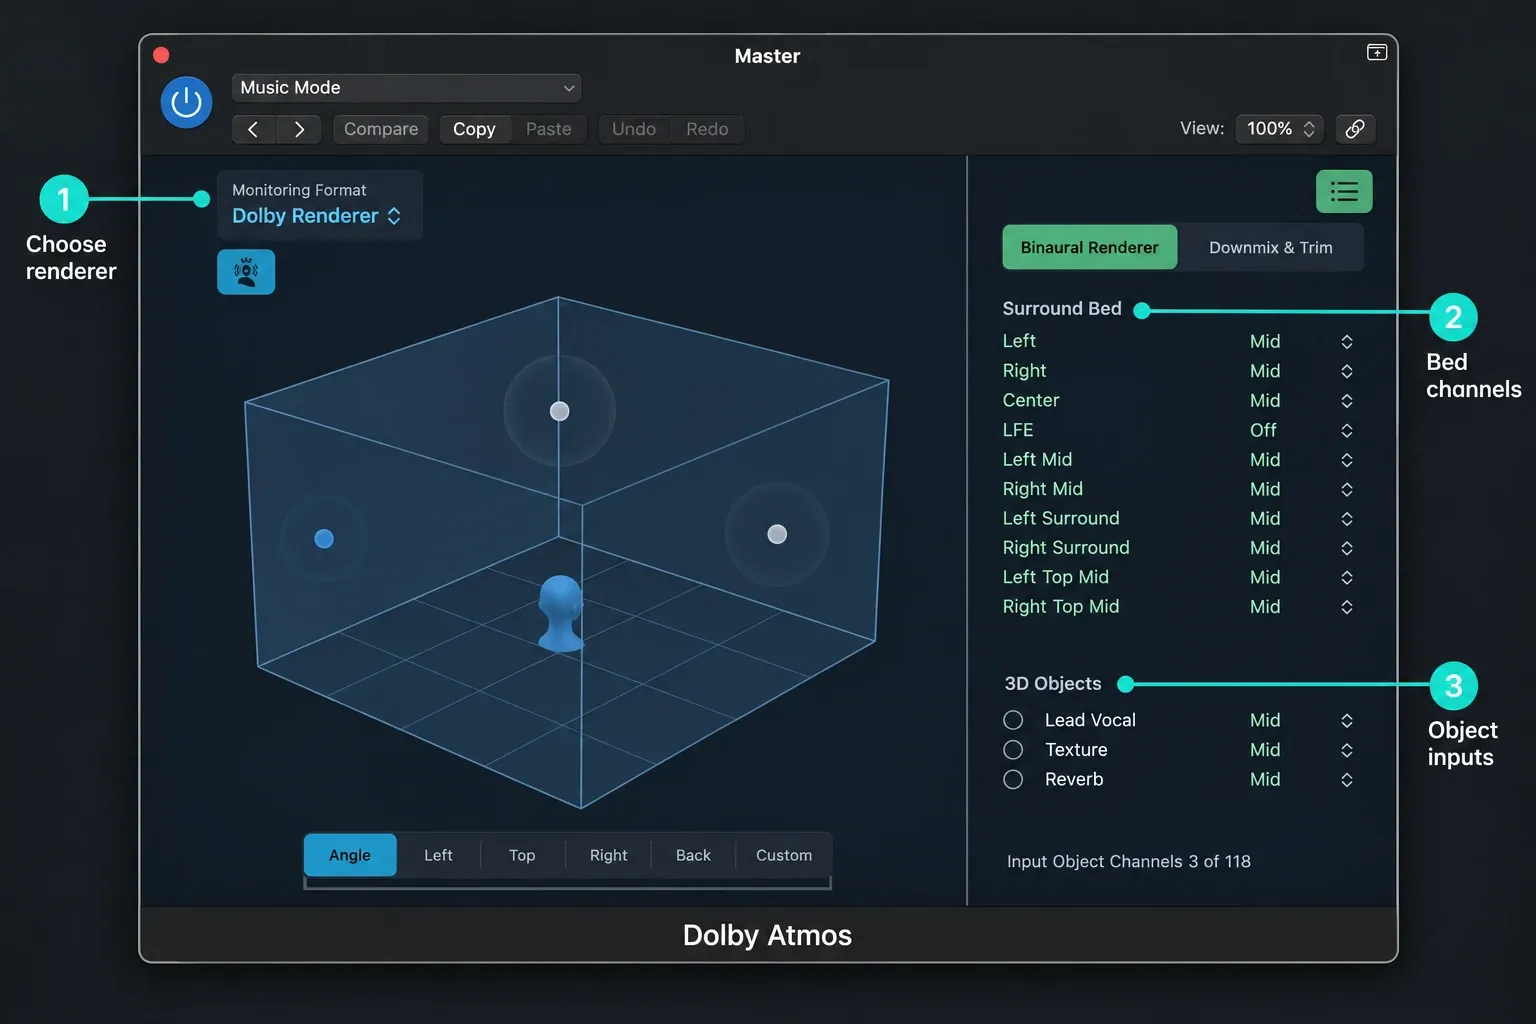
The master-bus trap
The two paths do not hit the surround master in the same way. Apple’s signal-flow diagram shows that object tracks bypass effect plug-ins placed before the Dolby Atmos plug-in. If a compressor, EQ or color plug-in on that strip is essential to the sound, the bed hears it and the objects do not.
Do not fix that mismatch by blindly copying a stereo mastering chain around the project. Move source-specific processing to tracks and buses where every intended signal actually passes through it. If several channels need to move as one object, Apple’s documented route is to feed them to an aux, then make that aux an object.
Objects and LFE
An object track has no direct LFE control. If a specific object needs an LFE contribution, Apple documents an aux workaround: send from the object track to an aux, make that aux a bed track, filter the send appropriately, and route that bed signal to LFE. Treat this as a deliberate low-frequency effect path, not a substitute for bass management.
Place objects with a reason, then automate sparingly
The 3D Object Panner controls planar position and elevation. The panner sends position data as metadata while the object audio stays separate. That is why the same master can render to headphones, 5.1.2 speakers or another supported layout without baking every object into fixed channels.
Start with a static position. Set the front/back and left/right location, then add elevation only when it improves separation or creates an intentional perspective. Once the static mix reads clearly, automate one movement at a time. Constant motion may look sophisticated in the object viewer while making the musical focus harder to follow.
Good first object candidates are a lead element that needs clean front-center placement, a short transition effect that moves through the room, or an overhead texture with a clear arrangement role. A full session of moving objects is rarely the clearest first Atmos mix.
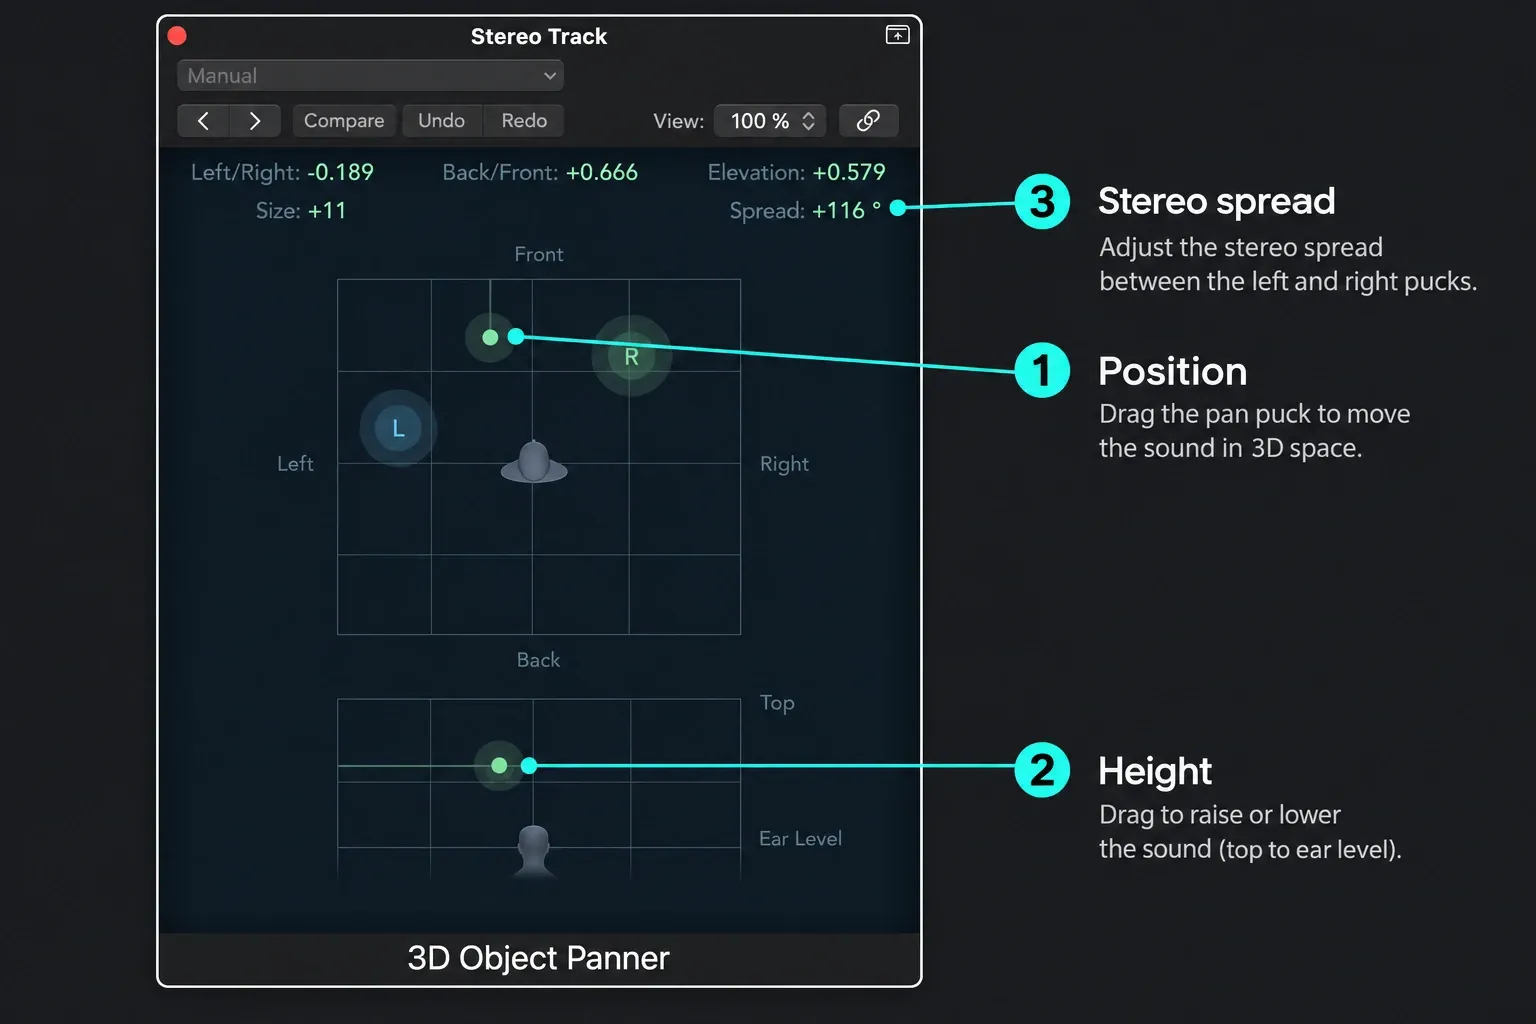
Binaural monitoring: Dolby Renderer versus Apple Renderer
Headphones are useful for Atmos work, but “binaural” is not one universal sound. Logic offers multiple monitoring formats because different renderers can interpret the same object-based master differently.
Dolby Renderer monitoring gives each bed channel and object a binaural render mode: Off, Near, Mid or Far. Mid is the default; LFE remains Off. These values influence perceived distance in the Dolby binaural render.
Apple Renderer monitoring is intended to represent Apple Music and Apple TV headphone playback. Logic can expose head tracking, a personalized profile, Music Mode and Movie Mode where the system supports them. The crucial rule is that Dolby binaural render modes do not affect Apple Renderer monitoring.
Dolby Renderer — binaural
Use it to
Judge Dolby Near/Mid/Far decisions on headphones
Keep in mind
It is not a preview of every platform renderer
Apple Renderer
Use it to
Hear an Apple Music/Apple TV headphone perspective
Keep in mind
Near/Mid/Far settings will not change this monitor
Speaker format
Use it when
A correctly routed speaker system is available for checking channel-format translation
Keep in mind
Do not assume a headphone decision translates automatically to the room
Switch formats at matched listening level and write down what changes: vocal focus, low-end balance, front/back depth, height audibility and reverb spread. Apple’s current monitoring-format guide explains that the renderer turns the object-based mix into the chosen channel-based listening format. The monitoring choice is a review lens, not a change to the ADM master.
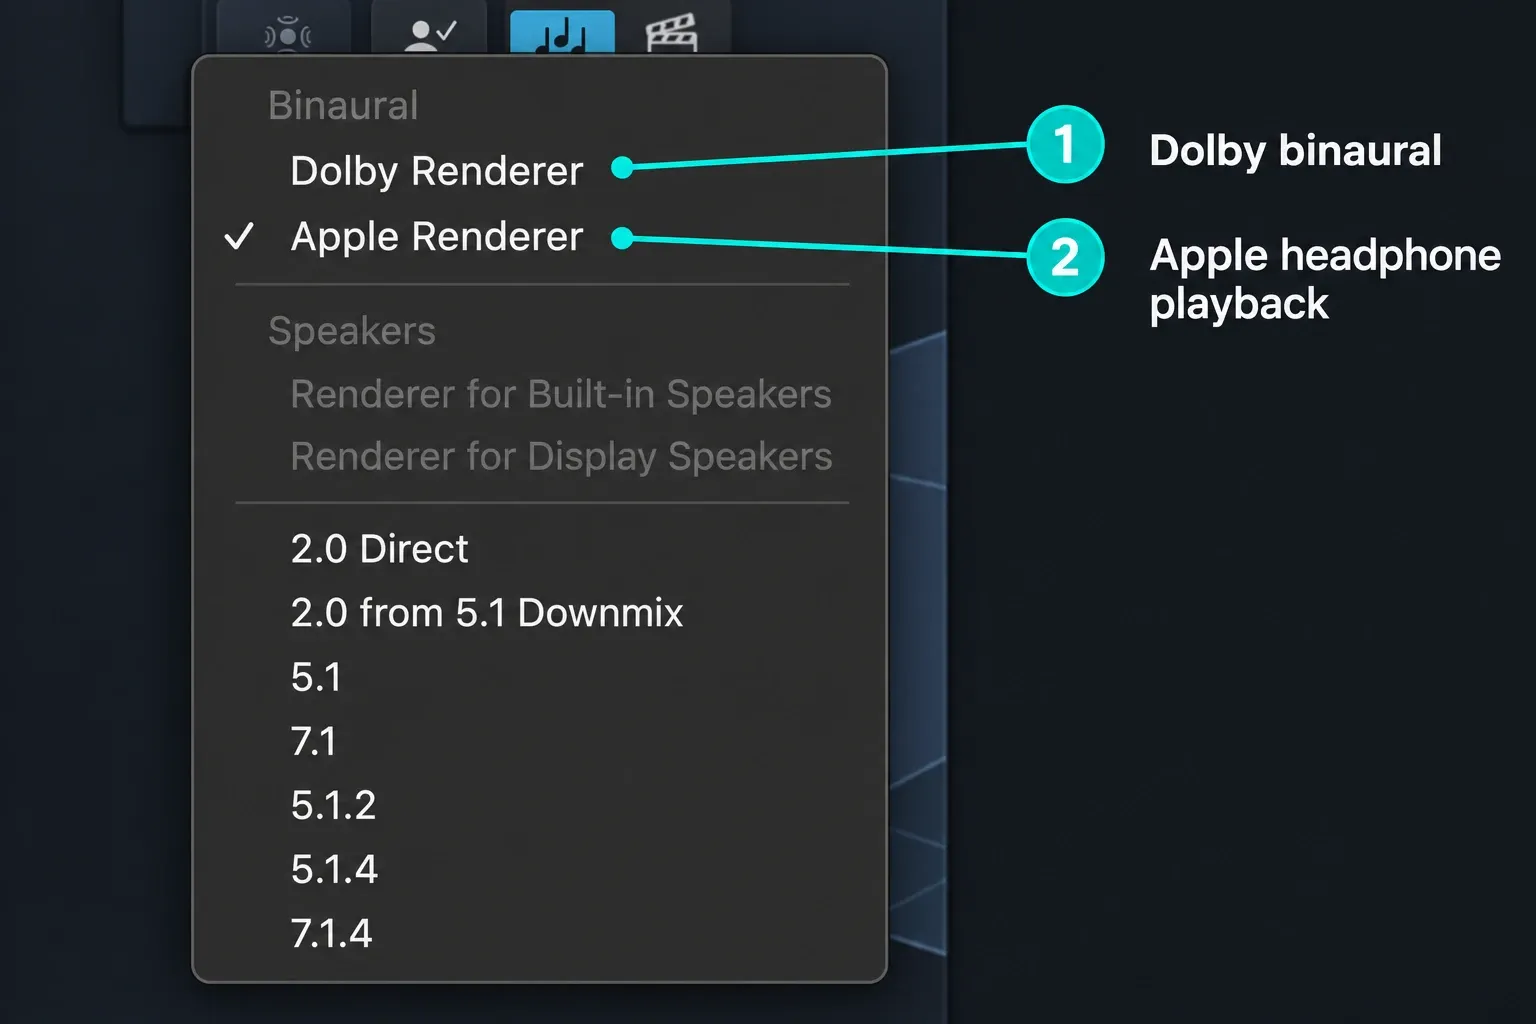
Run a translation pass before export
Do not approve the mix from one renderer at one level. Make a short, repeatable pass through the same sections:
- Front focus: the lead vocal, snare and bass relationship should still read when switching renderers.
- Bed stability: wide foundations should not collapse into an unfocused wash.
- Object continuity: automated moves should sound intentional through the whole path, not only at the endpoints.
- Height restraint: overhead placement should create a useful layer, not make the source feel detached.
- Effects tails: check the start and end of the export range so reverb and delay are not cut.
- Stereo companion: compare the artistic balance with the approved stereo version without forcing both masters to be identical.
If a conventional reference bounce differs from project playback, use the same output, range, level and listening app before changing the mix. The bounce-versus-playback checklist covers those signal-path mismatches.
Binaural bounce and ADM BWF export are different deliverables
Logic’s Bounce command uses the current monitoring signal to make a conventional channel-based file. That is useful for a headphone reference, review link or quick comparison. Apple explicitly warns that a bounced monitoring file is not the master submitted to a streaming service.
Make a two-channel binaural reference
Choose the binaural monitoring format you want the reference to represent, then bounce the project or section. Apple’s current channel-based bounce instructions specify 48 kHz for the binaural file and require Surround Bounce to be off. Treat this as a listening copy. If the file sounds wrong outside Logic, debug it as a bounce, not as an ADM export.
Export the Atmos master
- Confirm the project range or make the required selection.
- Choose File → Export → Project as Spatial Audio. You can also open Project or Section Bounce and click Export as Spatial Audio.
- Choose Dolby Atmos ADM BWF.
- Choose Project for the entire project or Selection for the cycle range, marquee selection, or span of the selected regions. Check the resulting range against the delivery brief.
- Name the file clearly and save it.
Apple defines ADM BWF as the delivery master for a Spatial Audio mix. It contains the surround-bed channels, the separate mono and split-stereo object audio, object pan automation and configuration data. The selected monitoring format has no effect on this object-based export.
Do not confuse the ADM with grouped stems or conventional multitracks. If the recipient asks for both, handle the stem and multitrack export as a separate deliverable with its own range, naming and routing checks. The distinction between Bounce, Export and in-session printing also matters; each command answers a different need, as the Bounce in Place versus Export guide explains.
ADM export preflight
- The project is 48 or 96 kHz and the Atmos format is active.
- The 24 fps frame rate set automatically when Atmos was enabled is intact for this music mix.
- Every bed/object choice is deliberate; stereo objects use two object inputs.
- Object tracks do not depend on surround-master inserts that they bypass.
- Any LFE contribution from objects uses a controlled aux-to-bed path.
- The export range includes the full opening, final decay and required handles.
- Dolby Renderer and Apple Renderer checks have been treated as separate translation passes.
- The binaural reference and the ADM BWF master have clear, different filenames.
- The ADM is delivered with the requested stereo master, stems or notes as separate files when required.
The practical workflow is simple once the signal paths stay visible: build a stable bed, promote only useful elements to objects, judge more than one renderer, and export the object-based master instead of mistaking the monitoring bounce for delivery.


