How to Make a Trap Beat in Logic Pro: Drums, 808 and Arrangement
Build a two-bar trap phrase at 140 BPM, with explicit drum steps, 808 notes and lengths, a small melodic motif and a practical arrangement map.

To make a trap beat in Logic Pro, build a half-time drum phrase, write a tuned 808 line around the kick, then leave enough space for a melody and a vocal. Start with one short phrase you can explain. A busier kit won’t fix a weak rhythm.
This guide gives you an original two-bar example at 140 BPM in 4/4: a clap on beat 3, sparse kicks, eighth-note hats with one short roll, and a C-minor melodic idea. These are composition choices for the example, and they don’t set rules for every trap track. You can build everything with Logic Pro for Mac and its included instruments. No paid drum pack is required.
Set the tempo and understand the half-time count
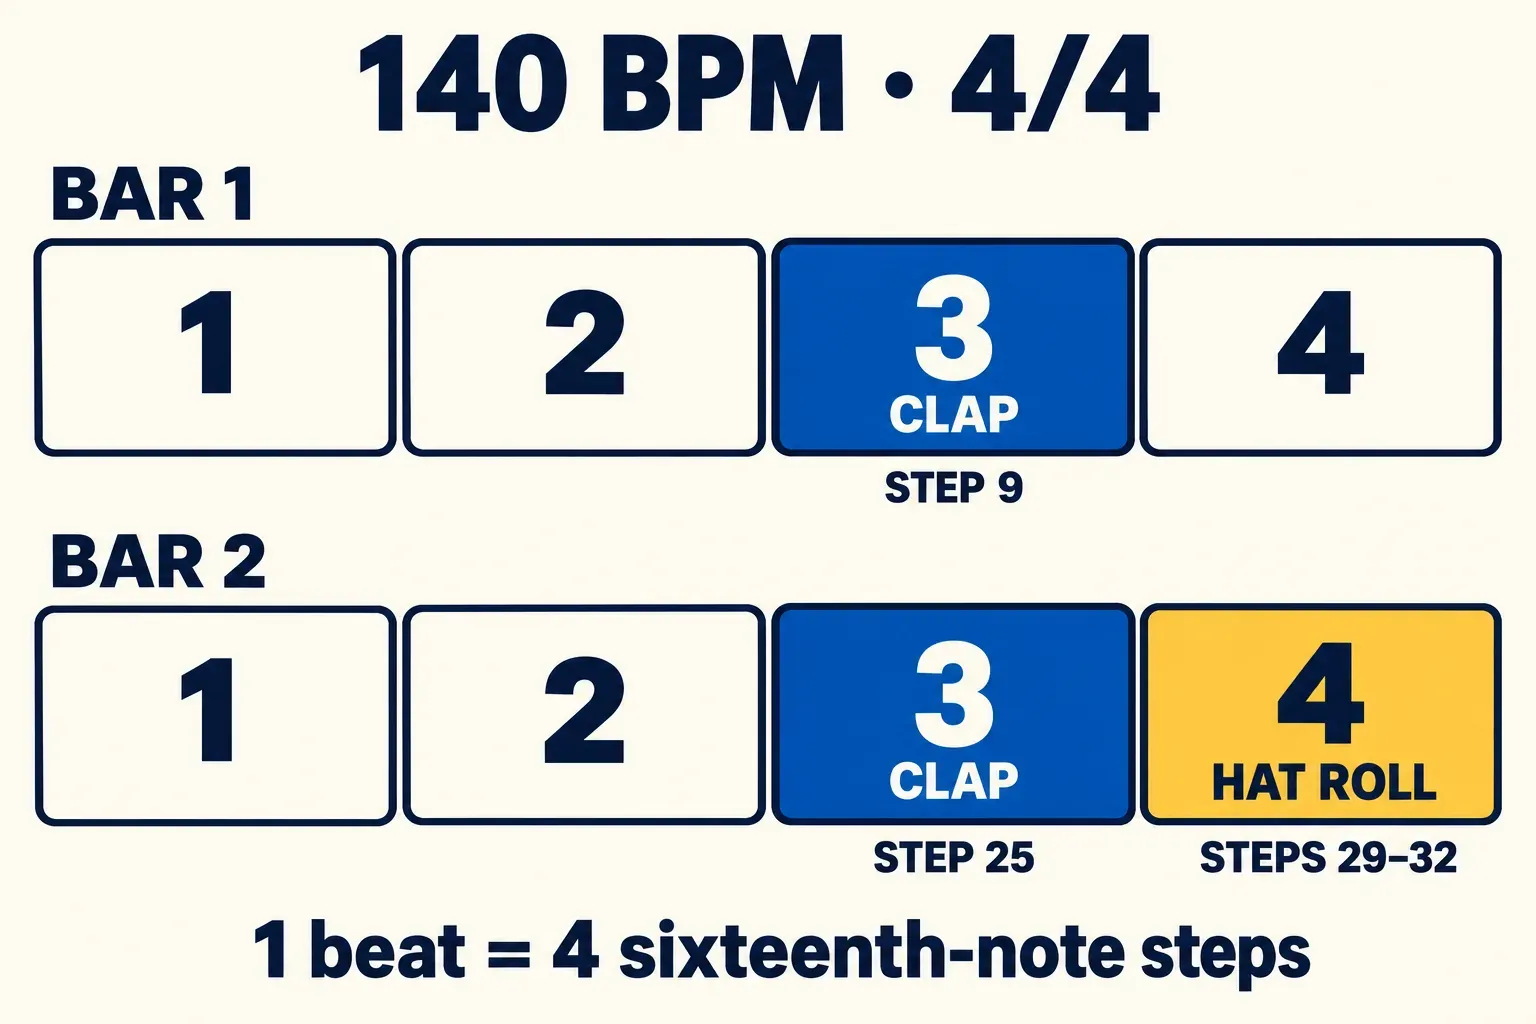
Set the project to 140 BPM and count four quarter-note beats per bar: 1, 2, 3, 4. Put the main clap on beat 3. That gives this example its half-time backbeat. The clap doesn’t land on both beats 2 and 4.
You could describe the underlying slower pulse as 70 BPM, but changing the project from 140 to 70 while keeping the same MIDI positions doubles the duration. Keep the project at 140 while following the step numbers below. Do not switch tempo conventions halfway through programming.
Choose four drum sounds and a two-bar grid
Create a software-instrument track, open the Library and choose an Electronic Drum Kit. Keep one kick, one clap or snare, one closed hat and one optional open hat. For this first phrase, turn off extra percussion rows. Apple documents the Drum Machine Designer kit and pad workflow, including how to replace a sound from the Library or with an audio file.
I’d choose a short kick and a clearly pitched 808 rather than two long low-frequency sounds competing for the same space. Choose your own samples only if their license permits your intended release. Finding a file online doesn’t give you permission to release it.
- Select the main Drum Machine Designer track. Control-click an empty part of its track lane and choose Create Pattern Region, as in Apple’s pattern creation instructions.
- In Step Sequencer, set Pattern Length to 32 steps in the 4 Based section and Pattern Step Rate to /16. Do this before entering notes: increasing the length later duplicates existing steps.
- Keep every drum row running forward over all 32 steps, with no Skip steps or individual step-rate overrides. Keep the pattern’s Mono mode off so the kick, clap and hats can play together.
- Extend the pattern region to cover two full bars. If the grid shows only part of the pattern, use its page overview to reach the remaining steps.
At /16, each quarter-note beat contains four steps. With those row settings, 32 steps fill two bars of 4/4. Apple’s pattern-length reference explains why shortened row loops, other playback directions or a short region can change that result. If you need help finding the editor controls, use the separate Step Sequencer guide.
Program the kick, clap and hats
The numbers here count continuously across the full 32-step pattern. Bar 1 is steps 1 to 16; bar 2 is steps 17 to 32. In Step On/Off mode, activate only these cells on the corresponding sound rows:
| Sound | Bar 1 steps | Bar 2 steps |
|---|---|---|
| Kick | 1, 7, 12, 15 | 17, 23, 28, 31 |
| Clap or snare | 9 | 25 |
| Closed hat | 1, 3, 5, 7, 9, 11, 13, 15 | 17, 19, 21, 23, 25, 27, 29, 31 |
| Open hat, optional | None | 22 |
Begin without the open hat. The kick at step 7 anticipates beat 3, and the clap at step 9 then supplies the backbeat. The second bar keeps the same basic kick relationship so the phrase has a recognizable shape.
For an editable starting point, try kick velocity 105 and clap velocity 100. Alternate the closed hats between 85 and 60, starting with 85 at step 1. These are MIDI velocity values, not percentages, and they are examples rather than target loudness readings. Apple’s Step Sequencer edit-mode reference gives the 1 to 127 range and notes that a patch can map velocity to parameters other than loudness.
Play the drums alone before adding effects. If the backbeat feels rushed, check the clap positions and the count first. If simultaneous hits disappear, check pattern Mono mode and the sound assigned to each row. A different kit may map its pads differently. Follow the sound names rather than copying MIDI drum-note numbers from another kit.
Add one controlled hat roll
Keep the first bar plain. On the closed-hat row, turn on 29, 30, 31 and 32. Shift-click each of those steps, open the local inspector and choose Step. Set Repeat to 2 for each, with Distribution at 0 for even spacing. Keep Repeat at 1 elsewhere. Apple lists these controls in the Step inspector instructions.
Note Repeat divides the existing step duration, so it doesn’t need a faster row rate. Four /16 cells with two evenly spaced hits each produce eight /32 hits over beat 4 of bar 2. Keep these fill steps quieter than the main hat accents. Inside each repeated step, a positive Velocity Ramp in the Step inspector swells the hits and a negative value fades them. For a tighter variation, set Repeat to 3 on the same four steps: each /16 cell then holds three even hits, a run of 32nd-note triplets. Remove the roll if it distracts from the clap or the next downbeat. You can also leave out the optional open hat if it rings over too much of the fill.
Write the 808 line around the kick
Add another software-instrument track with Quick Sampler and load a sustained, pitched 808 sample. If you want to preserve the source’s tuning and length while importing, use the Original drop area. That’s an import choice rather than a playback mode. Apple separates those choices in its Quick Sampler loading and playback guide.
Choose Classic, use No Loop for this non-looping example and turn on Key Tracking. Set Root Key to the note that represents the sample at its original pitch. Do not set it to C just because the song is in C minor. Apple defines Root Key and Classic playback separately from the Key Tracking pitch control. If the source pitch is uncertain, resolve that with the existing 808 tuning and sound-design workflow before copying this phrase.
Create a two-bar MIDI region and open the Piano Roll. The following bass line uses C and G under the first bar, then A-flat and E-flat under the second. The MIDI numbers specify the register. Each length is measured in sixteenth-note cells on the same grid used for the drums.
| Start step | 808 note | Length in /16 cells |
|---|---|---|
| 1 | C, MIDI 36 | 5 |
| 7 | C, MIDI 36 | 4 |
| 12 | G, MIDI 43 | 2 |
| 15 | C, MIDI 36 | 2 |
| 17 | A-flat, MIDI 32 | 5 |
| 23 | A-flat, MIDI 32 | 4 |
| 28 | E-flat, MIDI 39 | 2 |
| 31 | A-flat, MIDI 32 | 1 |
For example, the first C starts with the kick at step 1, lasts five cells and ends at the start of step 6. That leaves one cell of space before the next kick and bass note at step 7. The final A-flat ends at step 32, leaving a short gap before the phrase restarts. This example uses no overlapping bass notes.
Use the Piano Roll Pencil tool to place notes and drag their right edges to set their lengths. Apple’s note-entry instructions explain that new notes inherit the previous note’s length and velocity, so check each duration rather than assuming every new note is short.
The MIDI length doesn’t guarantee the audible tail. Classic playback still depends on the amplitude envelope, and a short source sample can’t sustain indefinitely without looping. If the bass runs across the intended gaps, shorten the release or choose a tighter sample. Leave slides until the plain phrase is in tune and rhythmically clear. The detailed 808 guide covers that separate sound-design decision.
Add a sparse C-minor motif
Load a short bell or pluck sound on another software-instrument track. Use the same two-bar region length. Here is a small melodic part that leaves the clap position open:
- Bar 1: C, MIDI 60, at step 1 for four cells; G, MIDI 67, at step 7 for two cells; E-flat, MIDI 63, at step 13 for two cells.
- Bar 2: E-flat, MIDI 63, at step 17 for four cells; G, MIDI 67, at step 23 for two cells; B-flat, MIDI 70, at step 29 for two cells.
The first bar outlines C minor. The second can sit over the A-flat bass without another dense chord layer. Keep the notes short at first. If you add delay or reverb, check that their tails leave room for the next phrase. I’d make this small motif work before adding a second lead.
Now extend the idea to eight bars. Keep the two-bar phrase recognizable, but remove the hat roll from some repeats. In the last two bars, try dropping the melody for one pass and bringing it back on the next downbeat. Change one thing at a time so you can hear which change gives the section direction.
Turn the phrase into a full arrangement
Use separate copies for sections you want to edit independently. This 64-bar map is one starting arrangement, not a required trap-song form:
- Bars 1 to 8, intro: melody first; bring in quiet hats during the second half.
- Bars 9 to 24, main section: full kick, clap, 808 and motif. Reserve rolls for phrase endings.
- Bars 25 to 40, verse space: simplify the melody and leave out the optional open hat. Keep the backbeat stable.
- Bars 41 to 48, break: remove kick and 808, then use the melody to lead back in.
- Bars 49 to 64, final main section: restore the full phrase. Thin the last two bars if you want an ending rather than a hard cut.
For one transition, cut the melody short on beat 4 of bar 48, use the short hat roll there, then bring the low end back on bar 49. Keep the roll quieter than the returning downbeat. The broader Logic Pro arrangement workflow covers section editing once this musical plan is in place.
As an alternative to the melody cut, try opening a filter into bar 49. Insert Channel EQ on the melody and enable its Band 8 low-pass filter. Show Track automation with Mix > Show Automation, set the mode to Read and keep the main automation lane visible. Enable Mix > Autoselect Automation Parameter in Read Mode, then click Band 8’s Frequency control to select its curve. Draw a rise toward bar 49, choosing the frequencies by ear. Check the full return at a steady listening level and omit the move if it distracts from the downbeat.
Check the beat before bouncing
Listen to the kick and 808 together, then restore the melody. If the low end blurs, first change note lengths, relative levels or the sound pairing. Sidechain compression is an option when the bass needs to move out of the kick’s way. It isn’t a mandatory setting with one correct ratio or threshold.
Check the beat quietly and on a smaller playback system. If only the bass disappears, investigate the 808 sound and its upper harmonics rather than simply raising the sub. Keep the main output from clipping. Don’t force the arrangement into an arbitrary loudness target while you’re still choosing sounds.
Bounce a listening copy and check its beginning, ending and effect tails. If you plan to release it, confirm the terms for every imported sample or vocal. Then judge the result by whether the rhythm, bass and motif leave space for the intended performance. More rolls are rarely the missing part.
For a simpler first session, start with the general beat-making guide. For the next instrument or composition task, use the Create Music hub.


