Logic Pro Groove Templates: Create, Apply and Save a Groove
Give MIDI or audio regions a shared rhythmic feel, control how much timing changes, and keep groove templates working when you reuse them.

A groove template lets you borrow the timing of an audio or MIDI region and use it as the quantization grid for another part. Select your source region, open Quantize → Make Groove Template in the Region inspector, then select the destination region and choose the new named groove from that same menu.
The catch is easy to miss: keep the source region in the project. Deleting it can leave a groove name in the menu that does nothing. I would treat the source as part of the arrangement’s working material, even when it is muted and tucked away.
Choose a source that has the timing you actually want
Start with a short, clear rhythmic phrase: a hi-hat pattern, a percussion loop or a MIDI rhythm with useful offbeat placement. You are choosing a timing reference, so the source does not need the same instrument or pitches as the destination.
Apple recommends two-bar MIDI regions as a useful starting point, but groove templates accept MIDI regions of any length. More important than length is having a source note at every rhythmic position you want the template to offer. A sparse kick pattern cannot stand in for all the subdivisions of a busy hi-hat part.
For an educational example, imagine a two-bar percussion phrase named Slow Groove and a straight MIDI bass phrase. The aim is to move the bass toward that percussion timing without borrowing its loudness pattern or shortening the bass notes. The illustrations below use those example region names.
If you are creating the reference yourself, our guide to recording MIDI in Logic Pro covers getting the performance into a region. Avoid quantizing the source to a rigid grid first if its original timing is what you want to preserve.
Create the groove template
- Name the source region clearly. Use a name you will recognize in the Quantize menu, such as Slow Groove, instead of leaving several similar regions unnamed.
- Select the source region in the Tracks area. For an audio source, activate Flex on its track first. Apple specifies Flex as a requirement for extracting a groove from audio; this is not an audio-to-MIDI conversion step.
- Open the Region inspector’s Quantize menu. Choose Make Groove Template. The new entry appears near the bottom of the menu and normally takes the selected region’s name.
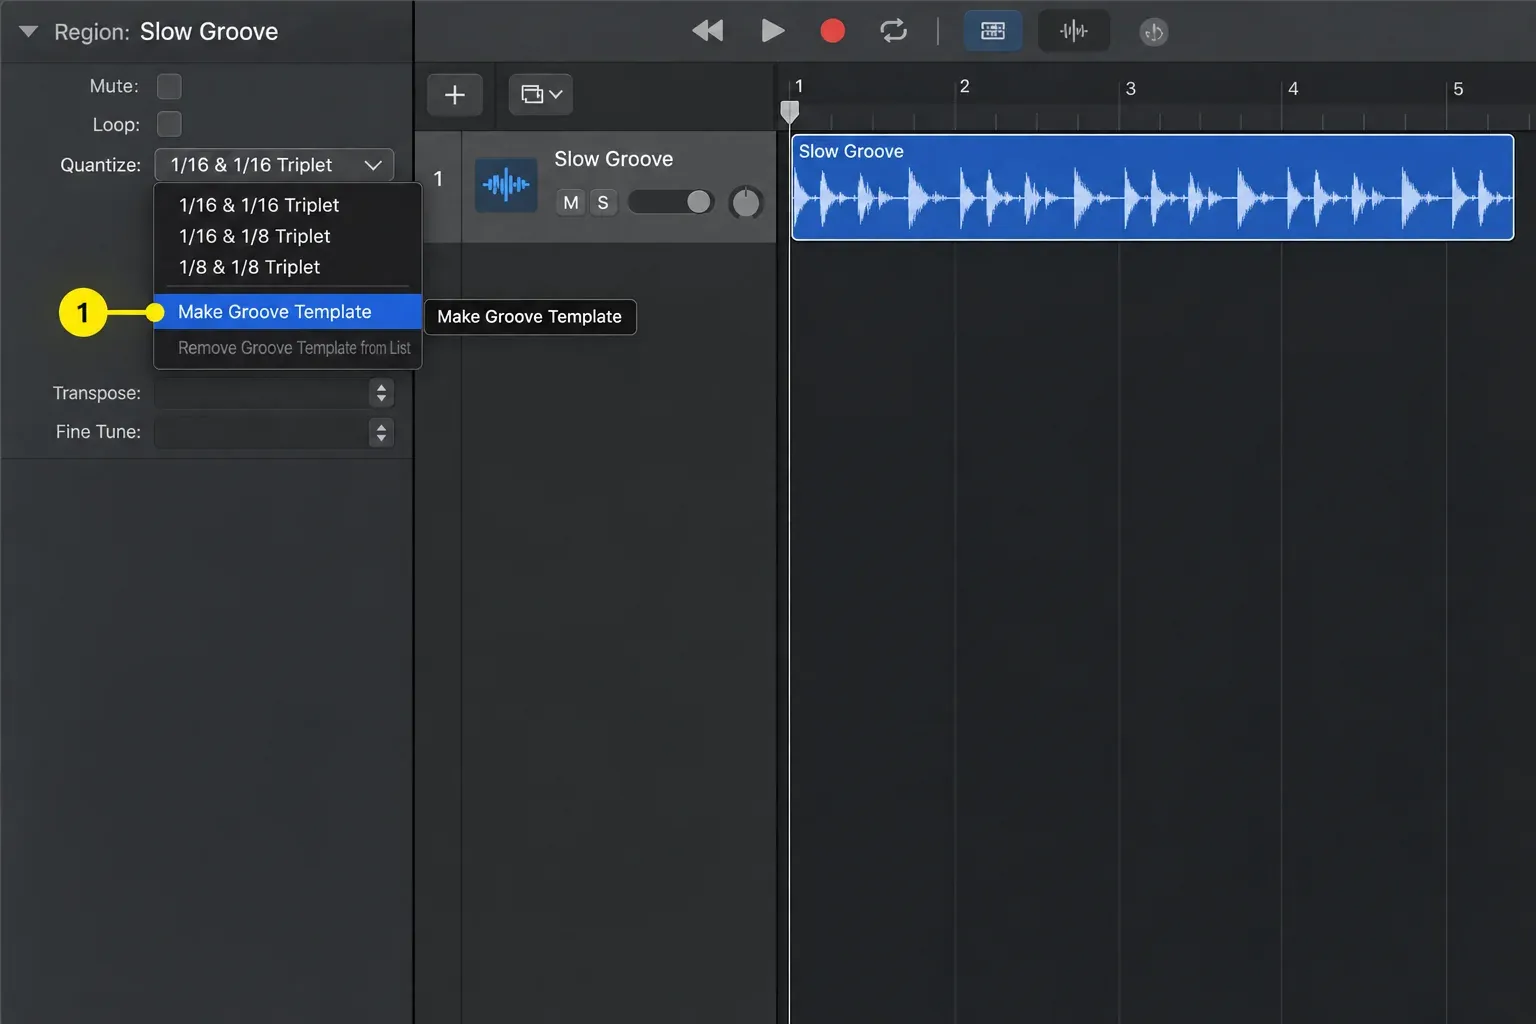
You can select several source regions before making a template. Their notes or audio transients contribute to the grid, but where several events sit around the same musical position, Logic evaluates only the first event at that position. Adding every percussion lane is therefore not a dependable way to average their timing. I would start with the one part that carries the feel most clearly.
For an audio reference, make sure the rhythmic events being used are the ones you intend. A sharp drum attack is easier to interpret than a long, swelling sound. If your real goal is to turn a recorded melody into instrument notes, use the separate audio-to-MIDI workflow; a groove template supplies a timing grid.
Apply the named groove to your destination region
Select the bass region—or the other region you want to change—and choose Slow Groove from Quantize in the Region inspector. Choosing Make Groove Template again would create another source template; selecting the named entry is the application step.
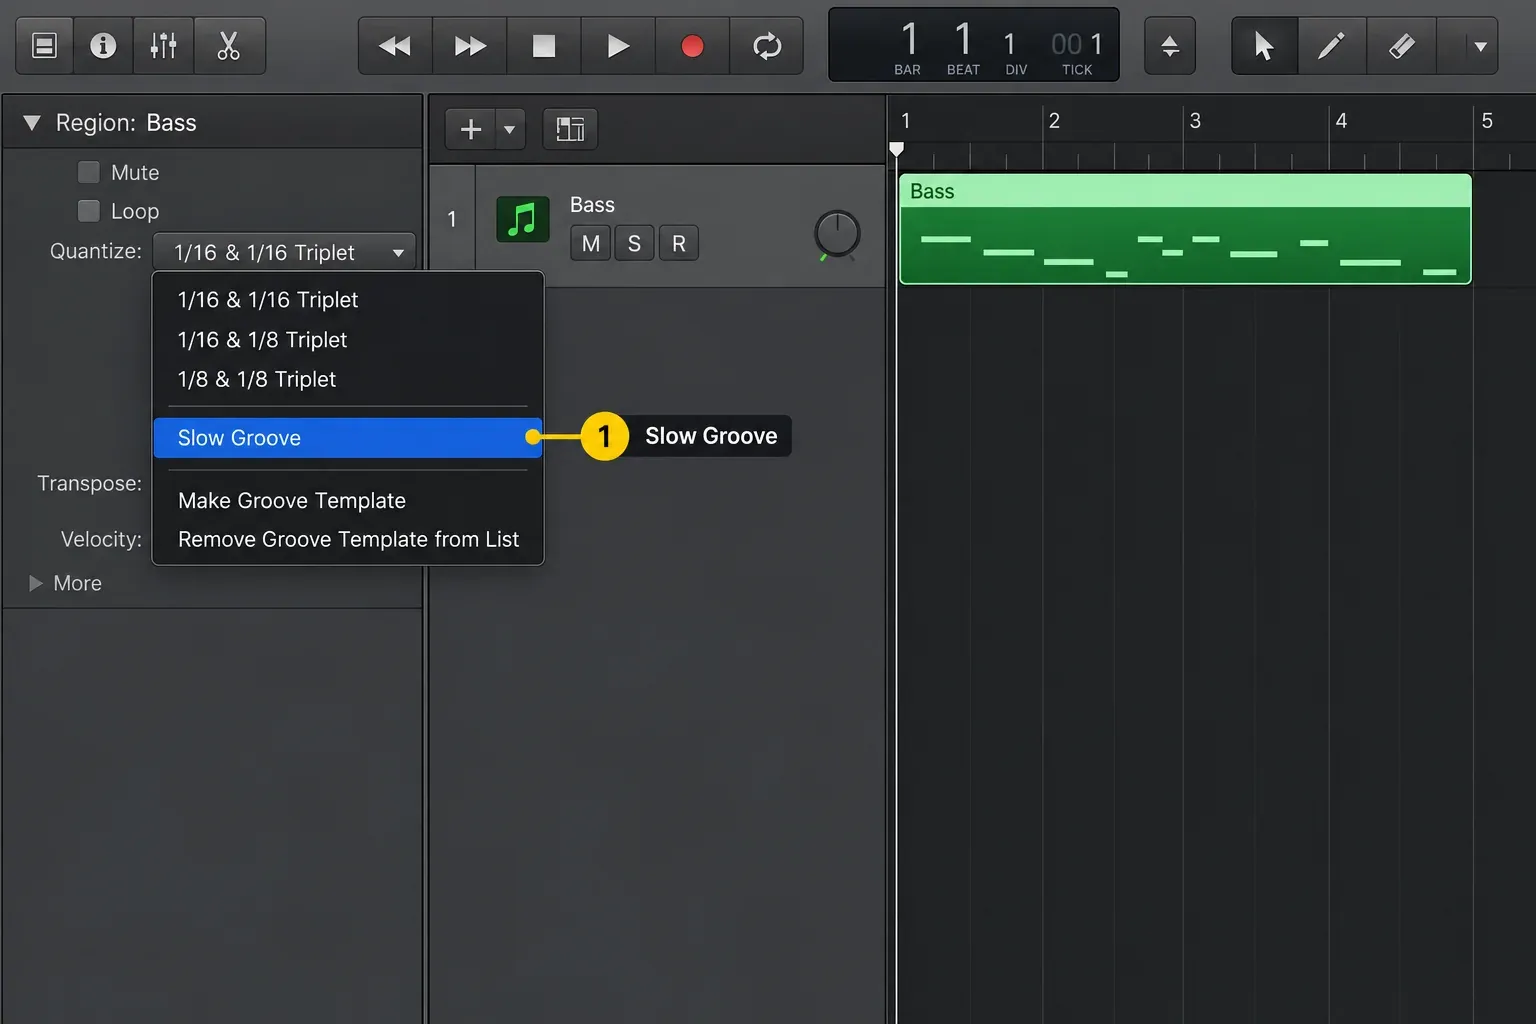
You may select multiple destination regions and apply the named template to the selection. This is a region-level operation: the Region inspector’s Quantize setting affects the whole region. Split a region if one passage needs a different treatment.
For an audio destination, assign a Flex mode to its track and enable the region’s Flex checkbox before quantizing it. These destination requirements are separate from enabling Flex on an audio source. For the wider MIDI and audio setup, see how to quantize audio and MIDI in Logic Pro.
Check the destination’s position as well as its setting. Logic’s MIDI quantization grid begins at the region’s start; if that start is offset from the beginning of a bar, the grid is offset too. A groove applied to a poorly aligned region may move notes toward different musical positions than you expected.
Control timing without copying the source’s dynamics
I would first change the timing on its own, then decide whether the source’s accents or note lengths suit the destination. A bass line usually needs its own note duration and articulation; sharing a drum groove does not make the drum’s note lengths useful bass phrasing.
In the MIDI Region inspector’s More section, separate these three controls:
- Q-Strength determines how far notes move toward the nearest grid position. At 100%, they move fully to the grid; at 0%, they stay at their recorded positions.
- Q-Velocity determines how much the destination adopts velocities from a source MIDI region. At 0%, the destination retains its velocities; at 100%, it adopts the template’s values.
- Q-Length controls borrowing the lengths of equivalent notes from a source MIDI region. At 0%, it has no effect; at 100%, the destination adopts those template note lengths.
The velocity and length controls described here use a MIDI source; do not expect audio transients to provide a set of MIDI velocities or note lengths.
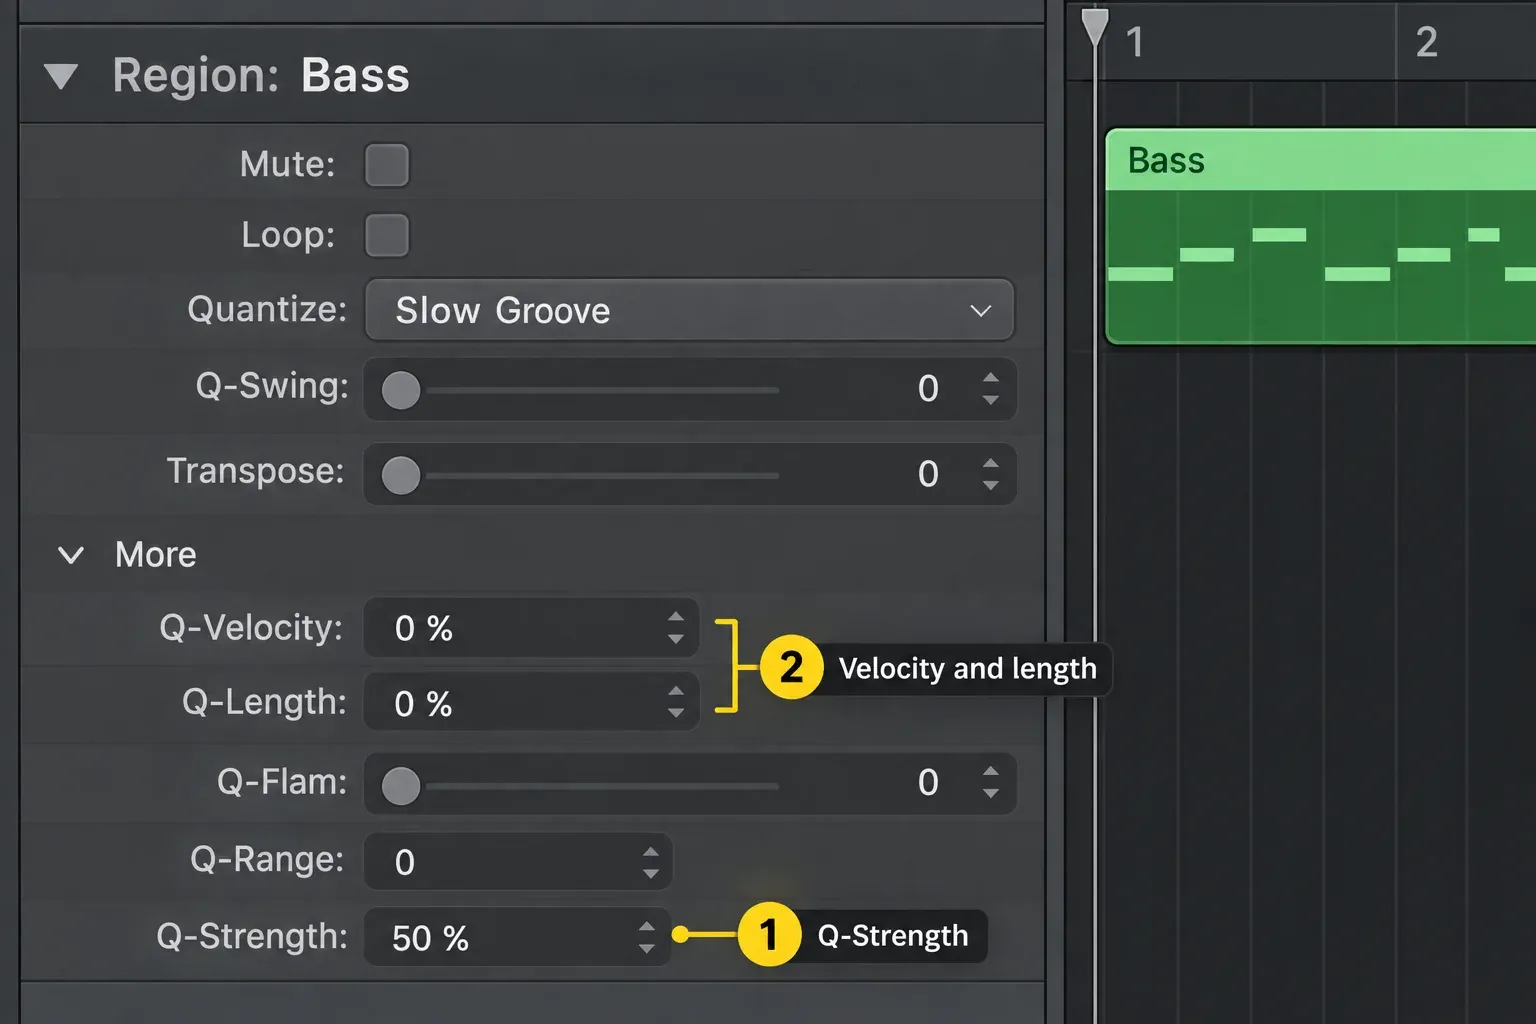
Try 50% Q-Strength as a comparison point, with Q-Velocity and Q-Length at 0%. That is an editorial starting point, not a magic setting. Listen to the target together with the source and the main rhythm: does the bass sit better, or do some notes now pull against the kick? Adjust strength until the timing serves the phrase.
If only some notes move, inspect Q-Range too. It can include or exclude notes according to their distance from grid positions. At its default value of 0, every note is eligible for quantization; Q-Strength then controls the amount of movement.
Keep the groove working and reuse it in new projects
The Quantize entry is not an independent copy of the source performance. Apple explicitly requires the original source regions to remain in the project. Keep the source, mute it if you do not want it heard, and label it so you will not mistake it for an unused region during cleanup.
A reusable project template keeps your groove sources together:
- Copy or create the source regions in one project and give them descriptive names.
- Choose Make Groove Template for each source region.
- Pack the source regions into a folder named Grooves, or another name that makes their purpose clear.
- Choose File → Save As Template.
- Start future projects from that project template when you want access to the saved grooves.
The distinction matters: you are saving a project template that contains groove sources, not exporting a universal groove preset. For a downloaded MIDI groove, bring its MIDI region into the project, then make a groove template from that region. Check what format the pack actually supplies before buying it; the words “groove pack” alone do not establish a usable Logic file.
When the groove does nothing—or moves the wrong notes
The name is present, but selecting it has no effect. Check whether the source region still exists. If it was deleted, restore the source from a suitable project backup or recreate the template from an available reference region. Also check that the destination, rather than the source, is selected.
The template applies, but timing barely changes. Look at Q-Strength and Q-Range. Zero strength means no timing movement. Notes already close to the template’s positions may also need very little movement, so judge the phrase rather than expecting every note to shift visibly.
The audio destination does not respond. Check its track Flex mode and region Flex setting. If the track is matched to a Groove Track, ordinary time quantization is unavailable for that track; decide which method you intend to use.
A dense part lands in odd places. Check the source’s rhythmic coverage and the destination region’s start. Try a reference containing the subdivisions that matter to the destination. Full-strength quantization toward a sparse source is a poor default for a busy phrase.
Groove Template, Groove Track or Beat Mapping?
A Groove Template is the choice when you want to select a named timing grid for particular regions and control its influence.
A Groove Track is useful when you want other tracks to follow one timing-reference track in the current project. There can be only one groove track, and tracks matched to it cannot use time quantization. It is a different relationship from selecting a named template in the Region inspector.
Beat Mapping addresses project tempo: it aligns musical ruler beats with a performance by creating tempo changes while leaving the recording’s absolute timing unchanged. Apple’s Beat Mapping overview describes that distinction. If you need a project to follow a recording’s tempo, our Smart Tempo guide covers that neighboring task.
For a regular alternating swing, Logic’s built-in swing quantization may be sufficient. Its swing presets delay alternate grid points by a fixed percentage; a groove template lets you use the rhythmic positions of a chosen performance instead.
Remove a groove from the menu without confusing it with a reset
To remove an entry, select it in the Region inspector’s Quantize menu, reopen the menu, and choose Remove Groove Template from List. The source region stays in the project.
This is not the same as undoing the groove’s timing. Apple says the removal operation preserves the actual quantization of regions using the template, while the selected region displays off (3840). If your aim is to recover a MIDI region’s original timing, choose off directly as its Quantize setting instead: MIDI region quantization retains the original positions. That assumes the notes have not also been permanently edited.
Keep a source library that earns its place in your sessions. A few clearly named grooves with their source regions intact are more useful than a long Quantize menu whose entries you cannot identify. For the next step in the arrangement, browse our Logic Pro music-making guides.


