How to Make a Beat in GarageBand on Mac, iPhone and iPad
On a Mac, GarageBand builds beats with a drum kit in the Piano Roll, a Drummer track or Apple Loops. The Beat Sequencer is on iPhone and iPad only. Here’s a starting tempo per style, three drum patterns to copy, and the steps to arrange, mix and export.

To make a beat in GarageBand on a Mac, set the tempo, then build the drums one of three ways: program a drum kit note by note in the Piano Roll, add a Drummer track and steer it, or drag in Apple Loops. Add bass and chords on software instrument tracks, loop the best bars, lay out sections in the Arrangement track and export. The Mac version has no Beat Sequencer. That step grid is part of GarageBand for iPhone and iPad only.
Below you’ll find each route step by step, a starting tempo for lo-fi, boom bap, trap and house taken from seven producer-guide publishers, three starter drum patterns you can copy into the Piano Roll, and the iPhone and iPad workflow. The last section covers when the beat is worth finishing in Logic Pro.
Does GarageBand for Mac have a Beat Sequencer?
No. The GarageBand for Mac User Guide has no topic on a Beat Sequencer or a Step Sequencer. Apple’s own Beat Sequencer article is written for GarageBand on iPhone or iPad. Some tutorials tell Mac users to switch a Drummer track into a Beat Sequencer mode, but that mode doesn’t appear anywhere in Apple’s Mac guide, so don’t go looking for it.
What the Mac does have is three solid ways to get drums down, and you can mix them in one project:
| Route | What you control | Best when |
|---|---|---|
| Drum kit in the Piano Roll | Every hit: where it lands, how loud it is and how tight it sits on the grid | You know the pattern you want or you’re copying one from a guide |
| Drummer track | Genre, drummer, complexity, loudness, fills and swing | You want a live-sounding groove fast and you’re happy to steer rather than write |
| Apple Loops | Which loop you pick and where you place it | You want a full beat from ready-made drum, bass and synth parts |
I’d start with the Piano Roll, because it’s the most direct way to place every hit yourself, and that skill carries straight over to Logic Pro’s Piano Roll and Step Sequencer if you move up later. Drummer and loops are great for speed, and you can layer them on top. Green MIDI loops are also editable in the Piano Roll; dragging a yellow Drummer loop onto a software instrument track converts it to editable MIDI.
What tempo should a GarageBand beat use?
Pick the tempo before you record anything. New projects start at 120 bpm, and you can set a different tempo in the Project Chooser when you create the project. To change it later, follow Apple’s tempo steps for GarageBand on Mac: click the triangle on the right side of the LCD, choose Beats & Project, then drag the tempo value up or down or double-click it and type a number. GarageBand accepts anything from 5 to 990 bpm, and you can also tap the tempo on your computer keyboard. New projects are in C major, and you can change the key in the same LCD. Apple Loops follow both the project tempo and the project key.
For a starting number, I took the tempo each publisher gives for the written tempo of a style, used the midpoint where a guide gives a range, and then took the median across publishers. One publisher counts once per style.
| Style | Median starting tempo | Range in the guides | Publishers |
|---|---|---|---|
| Lo-fi hip hop | 75 bpm | 60 to 90 bpm | 3 |
| Boom bap and classic hip hop | 90 bpm | 85 to 95 bpm | 3 |
| Trap (written tempo) | 140 bpm | 130 to 180 bpm | 5 |
| House | 124 bpm | 120 to 130 bpm | 3 |
The lo-fi row combines Native Instruments’ lo-fi hip hop guide, Soundation’s lo-fi page and the Meshplugins hip hop tempo chart. Boom bap comes from Sample Focus’s tempo guide, Meshplugins and the Native Instruments hip hop drums lesson. The trap row adds LANDR’s drum pattern guide and RouteNote’s trap tempo guide. House adds the Splice range quoted in Digital DJ Pool’s BPM guide.
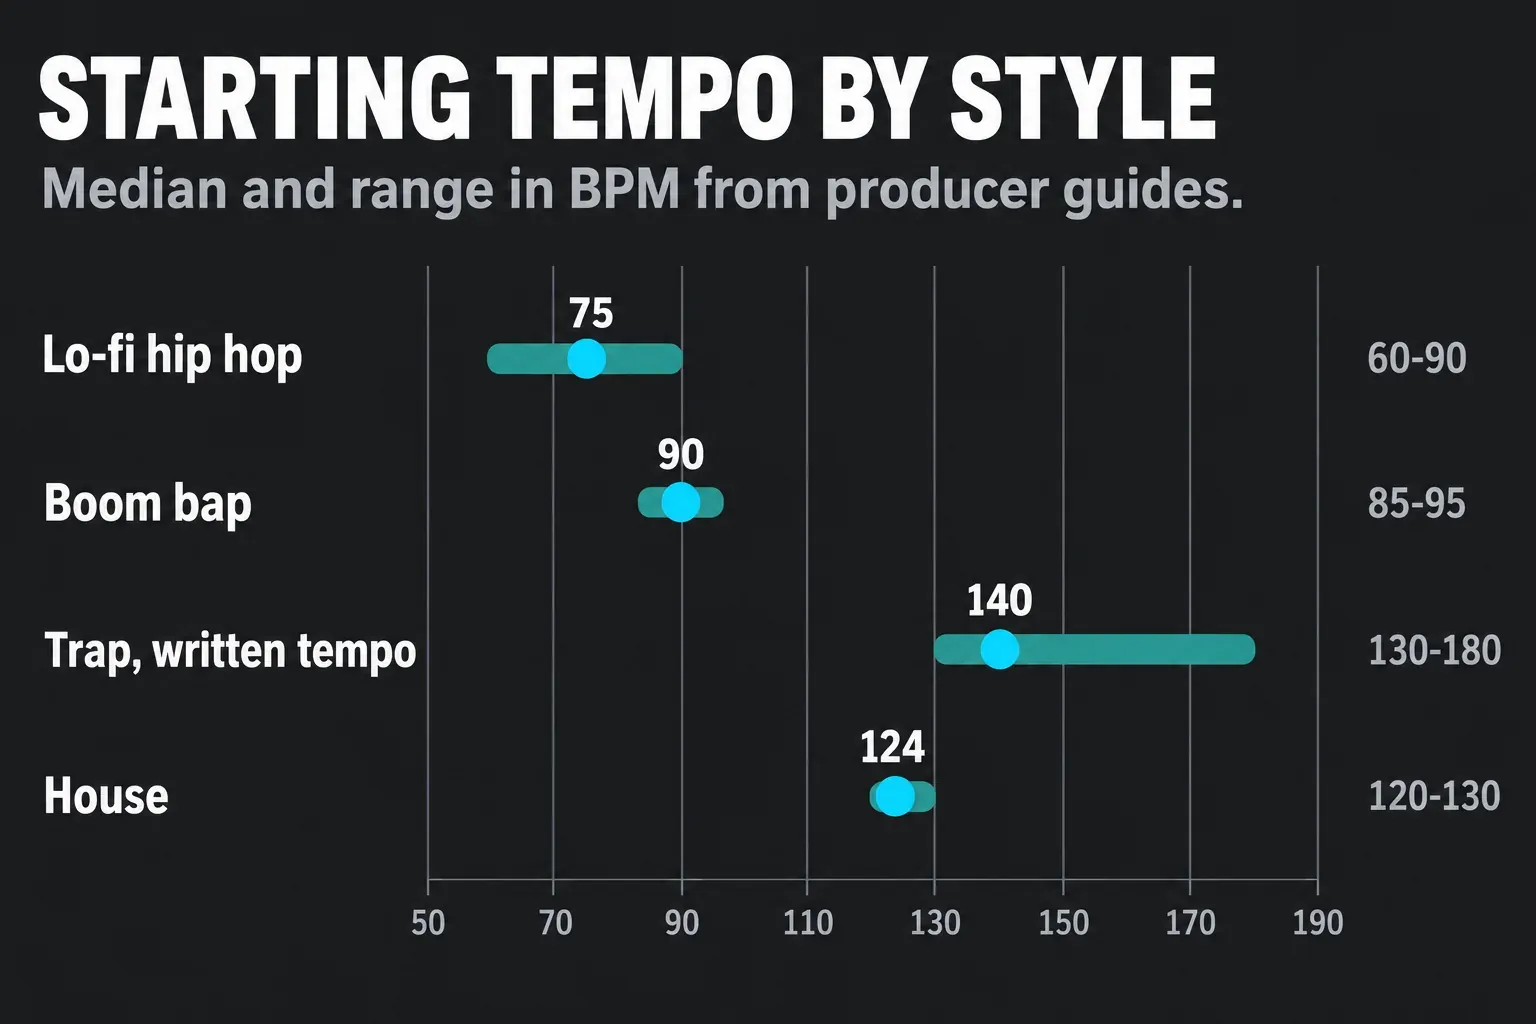
Trap needs one extra word. It’s written fast and felt slow. Meshplugins puts it plainly: place one snare per bar on beat 3 and a 140 bpm session feels like 70. Three of the guides give the felt tempo, and together they span 65 to 90 bpm. I’d type the written tempo into GarageBand, because the published trap patterns, including the one in the next section, are written that way and you can copy them step for step.
How do you program drums in the Piano Roll?
This is the Mac’s closest thing to a beat grid. You make an empty MIDI region on a drum kit track, then place each hit by hand.
- Choose Track > New Track or press Option-Command-N, then select MIDI in the New Track dialog to make a software instrument track.
- Click the Library button in the control bar or choose View > Show Library. Pick a drum kit patch from the categories on the left, or type a name in the search field. Click a patch and play a few notes to audition it.
- Command-click the track where the beat should start to create an empty MIDI region. Control-clicking the track and choosing Create MIDI Region does the same.
- Turn on Cycle by clicking the Cycle button or pressing C, then drag in the top part of the ruler to cover one or two bars.
- Double-click the region to open the Piano Roll Editor and make sure Edit > Snap to Grid is on. The grid value changes with zoom, so zoom in until you can see sixteenth notes.
- Find out which key plays which drum. Choose Window > Show Musical Typing or press Command-K, tap keys while the kit is selected, and press Z or X to move down or up an octave. A MIDI keyboard works the same way.
- Command-click in the Piano Roll to add a note at that pitch and position. Option-drag notes to copy them, for example a full bar of hi-hats into the next bar.
- Select notes and drag the Velocity slider in the Piano Roll header to make them quieter or louder. The editor’s velocity scale runs from 0 to 127. Higher velocity usually makes a hit louder, but the patch can also change its tone or attack. Try a few softer hi-hats to loosen a stiff pattern.
- Press L, or drag the upper-right edge of the region, to repeat the pattern.
Apple’s Piano Roll editing page mentions that a drum kit can include separate articulations, such as closed and open hi-hat, so one kit can give you more than one hat sound.
These three starter patterns come from Native Instruments’ drum pattern lesson. The counts read “1 and 2 and 3 and 4 and” for eighth notes in a 4/4 bar.
| Style and tempo | Kick | Snare or clap | Hi-hats |
|---|---|---|---|
| Hip hop, 87 bpm | Beat 1 and the “and” of 3, plus a quieter kick on the last sixteenth of beat 1 at velocity 71 | Snare on 2 and 4 | Closed hat on every eighth note |
| House, 123 bpm | Every beat, four to the floor | Clap on 2 and 4 | Closed hats on eighth notes plus a swung sixteenth just before beat 3, open hats on the eighth notes between the beats |
| Trap, 130 bpm, two bars | Bar 1 on beats 1 and 4, bar 2 on beat 2 | Clap on beat 3 of each bar, snares on the last two eighth notes of bar 2 | Closed hats on eighth notes, with the fourth hat in each bar (the “and” of 2) replaced by a roll of three 32nd notes |
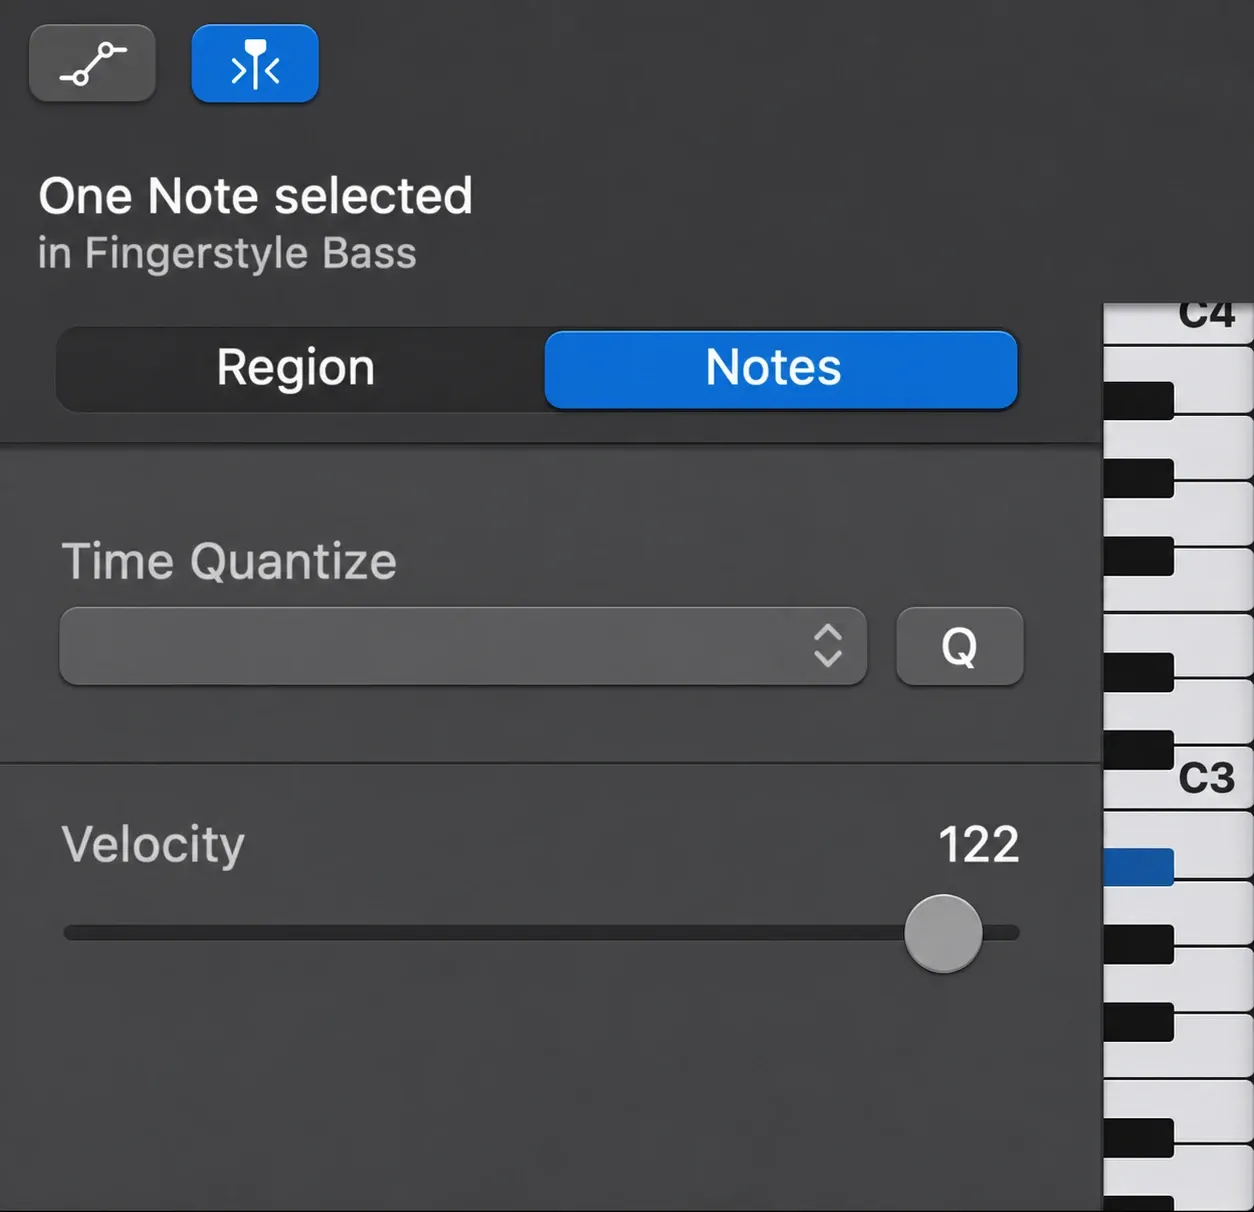
Would you rather play than click? Turn on the metronome with its button in the control bar, click the Count-in button for a one- or two-bar count-in, and record the kit from Musical Typing or a keyboard. Musical Typing’s C and V keys lower and raise the velocity. Then open the region, click the Region button in the Piano Roll inspector and choose a note value from the Time Quantize pop-up menu. Drag the Strength slider left if you want some of your timing to survive. Apple’s quantize guide says this works nondestructively, for playback only, so the original timing comes back when you set it to off.
Should you use Drummer or Apple Loops instead?
Use them when speed matters more than writing every hit. Both are built into GarageBand, and you can steer or swap them at any point.
Drummer. In the New Track dialog, select the Drummer track. With Cycle off and no arrangement markers, GarageBand creates a Drummer track with one 8-bar region. If Cycle is on, the new region takes the cycle area’s length instead. Each drummer comes with a kit and a playing style. Apple’s genre list covers Rock, Alternative, Songwriter, R&B, Electronic, Hip Hop and Percussion, so for beats you’ll mostly live in Hip Hop and Electronic. Double-click a Drummer region to open the Drummer Editor, then shape it:
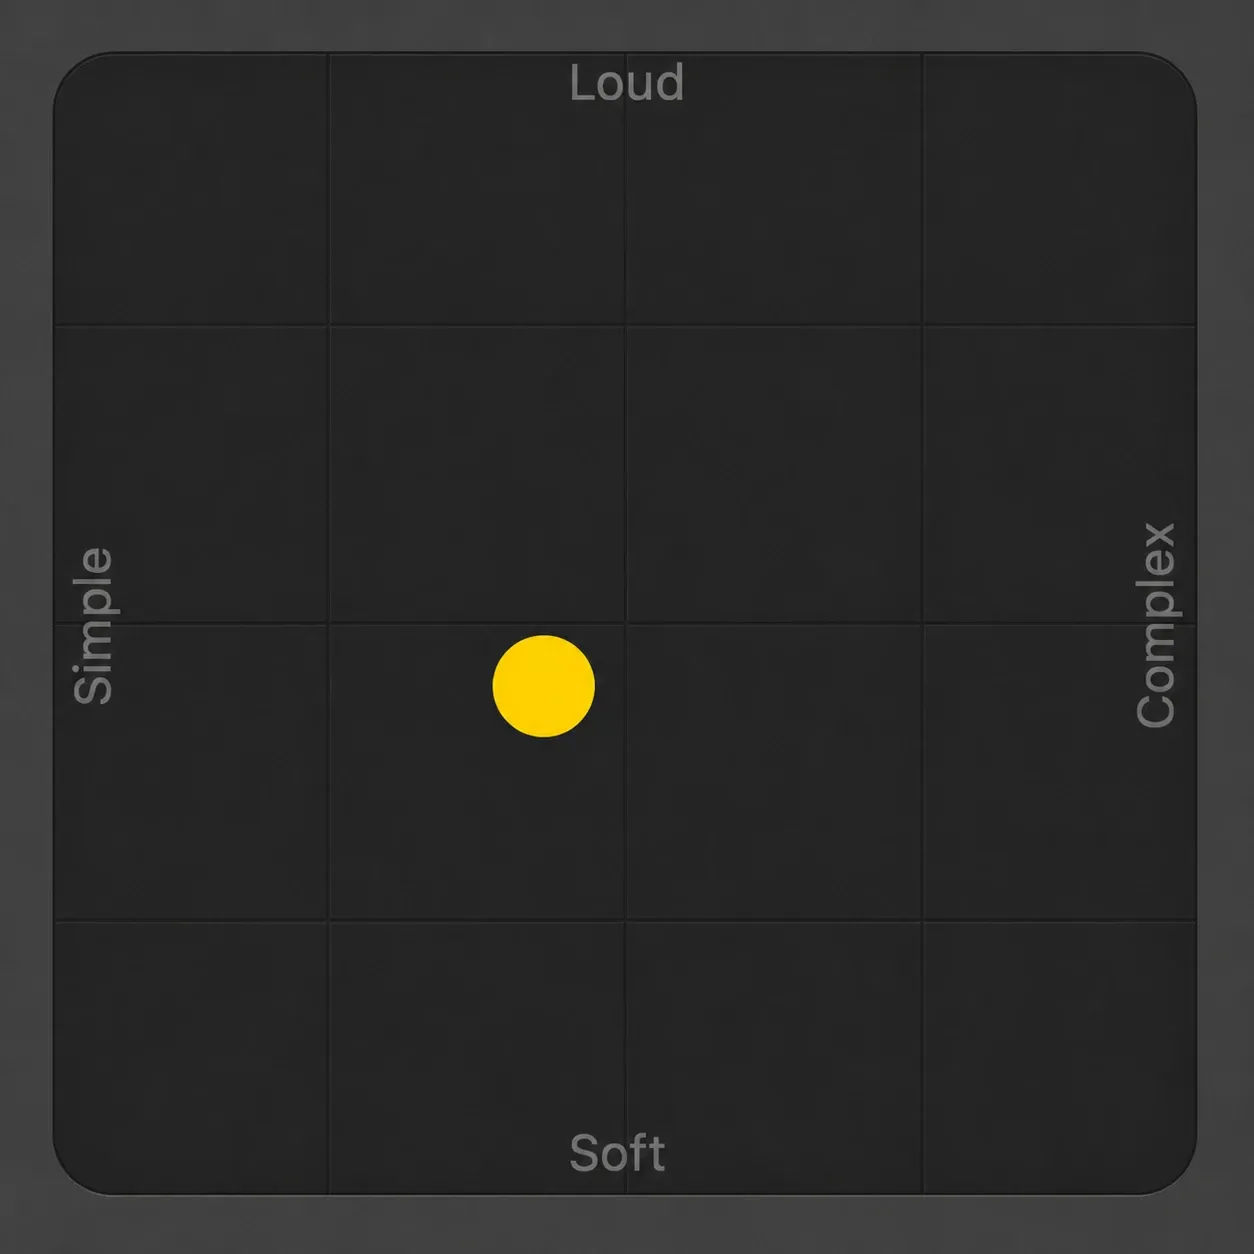
- Move the puck in the pad. Further right gives a more complex pattern and higher plays it louder.
- With an acoustic kit, choose 1/2 or 2x at the right end of the Kick & Snare slider for a half-time or double-time kick and snare.
- Drag the Fills knob down for fewer fills, drag the Swing knob for shuffle, and click 8th or 16th to set what the swing is based on.
Changes in the Drummer Editor affect only the selected region, so you can give the chorus a busier pattern than the verse. Command-click an empty area of the Drummer track to add another region.
Apple Loops. Click the Loop Browser button in the control bar or choose View > Show Loop Browser, type a search term and press Return. Drag a loop to the empty area below your tracks, and GarageBand creates a track of the right type for it (audio, MIDI or Drummer). Apple’s loop guide says an added loop always matches the project tempo, and pressing L loops the selected region. A drum loop plus your own hi-hats in the Piano Roll is a quick way to make a stock loop sound like yours.
How do you add bass, chords and melody?
Each part gets its own software instrument track, made the same way as the drum track. Choose a patch in the Library, create an empty MIDI region and Command-click notes into the Piano Roll, or record them from Musical Typing.
- Bass. Search the Library for a synth bass. Deep Synth Bass is one of the patches with the Transform Pad. Its eight snapshots each hold a complete sound, and dragging the framing box across them blends one into the next. Start the bass on the root note of your key and line its notes up with the kick.
- Chords. Keep them in the project key you set in the LCD. If you drag in Apple Loops for keys or pads, they change to match that key.
- Melody and movement. Click the Arpeggiator button in the Smart Controls menu bar to turn held chords into a pattern, then set Note Order, Rate and Octave Range.
Once the bass is in, try the Drummer Follow trick from Apple’s Follow guide: click a Drummer region, select the Follow checkbox in the Drummer Editor and choose the bass track in the Follow Track pop-up menu. The kick and snare in that Drummer region then follow the rhythm of the bass.
How do you turn a loop into a full beat?
Loop the parts first, then cut and reorder them into sections. To loop a region, place the pointer over its upper-right edge until it turns into the Loop pointer and drag, or Control-click the region and choose Loop. A looped region repeats until the end of the project or until the next region on the track. Option-drag a region to copy it.
For sections, choose Track > Show Arrangement Track and click the Add Marker button (+). Each marker starts 8 bars long and each new one starts at the end of the previous one. Drag a marker’s right edge to resize it, and click its name to pick a name from the menu or choose Rename. Apple’s arrangement marker steps show how to move whole sections from there to rearrange the song. With Cycle off, adding a Drummer track after the markers exist creates one region per marker with the same length and name. You can then edit each section’s Drummer region independently. If Cycle is on, its range takes priority and GarageBand creates a region for the cycle area instead.
A drop is an arrangement move more than a sound. Take the kick and bass out for the last bar or two before the hook, then bring everything back on the first beat of the next section. Because Drummer edits affect one region at a time, you can also give the bar before the drop a bigger fill.
How do you mix and export the beat?
Keep the drums and bass in the middle. Apple’s mixing overview says the most important tracks, usually lead vocals, solo instruments, drums and bass, sit in the center of the mix. Watch the clipping indicators in the master level meter and pull track volumes down if they light up.
For a fade, choose Mix > Fade Out. GarageBand adds four volume points to the master track, starting 10 seconds before the end of the last region, then at 7 and 4 seconds before it, and at the very end. Choose Track > Show Master Track, then Mix > Show Automation and select Volume in the master track’s Automation menu to move the points. If only part of the song should speed up or slow down, choose Track > Show Tempo Track and add the change there.
To export, choose Share > Export Song to Disk, pick AAC, MP3, AIFF or WAVE and a setting from the Quality pop-up menu. With Cycle on, the export option for the cycle area lets you bounce only the loop. Apple’s export guide notes that silence at the start or end is trimmed, so if a rapper or producer needs the file to line up with a session, make sure a sound lands on the first beat of bar 1.
How do you make a beat on iPhone or iPad?
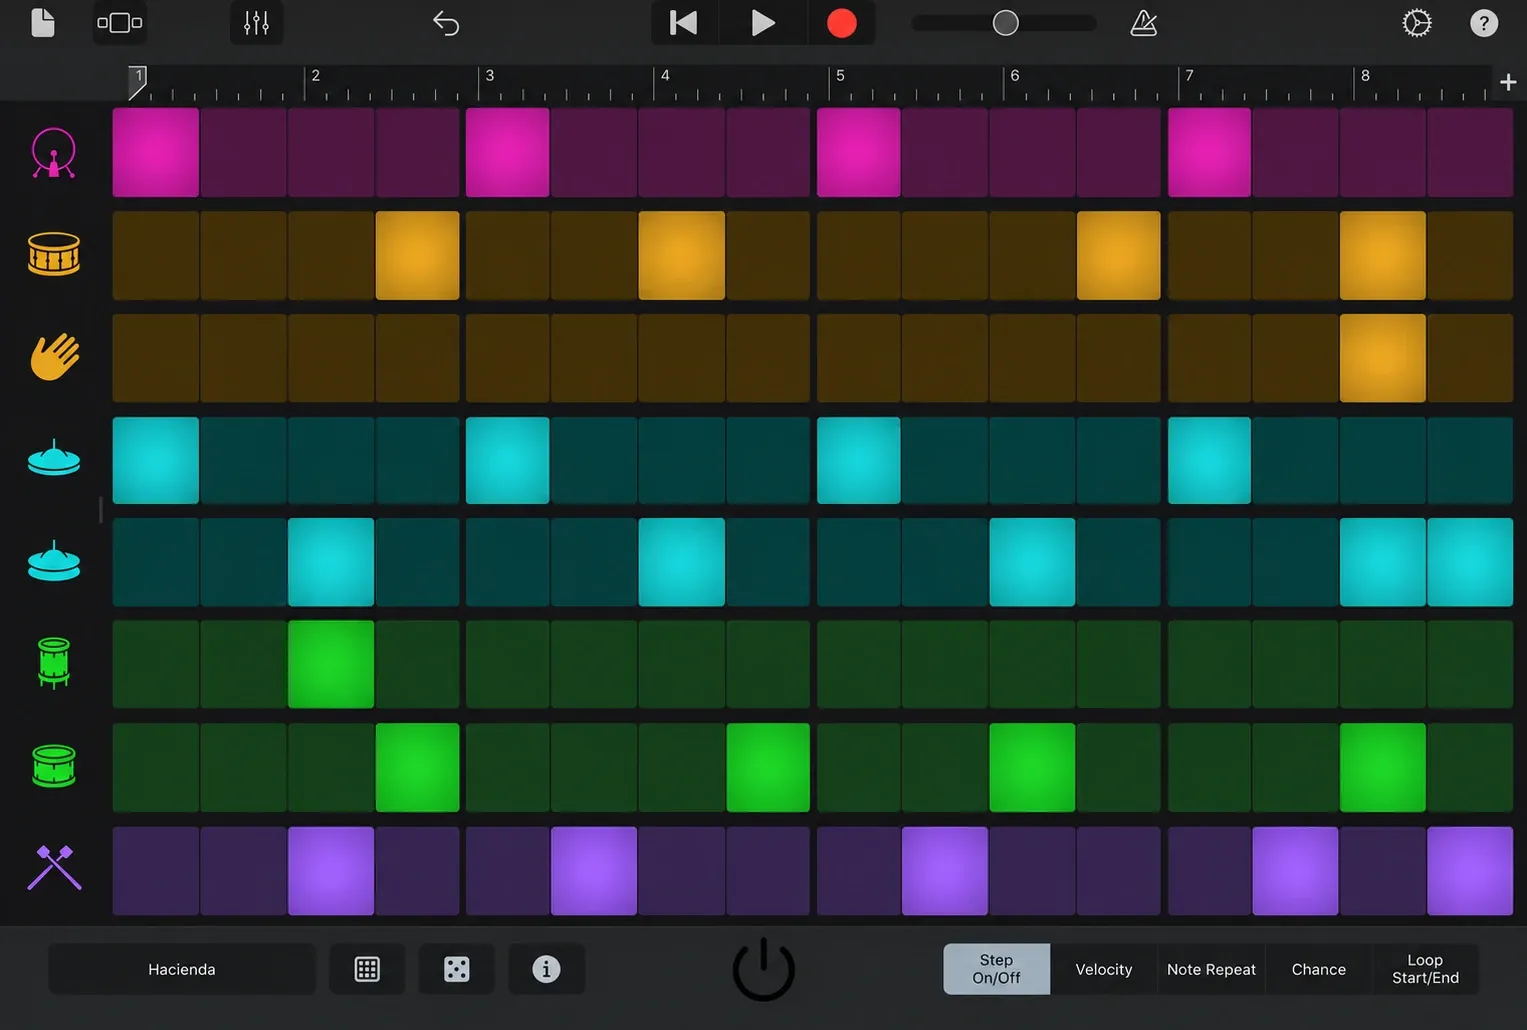
Use the Beat Sequencer. Apple’s article tells you to tap the Sound Browser button, swipe until you see Drums, then tap Beat Sequencer. Tap the Patterns button and choose New Pattern for an empty grid. Each row plays one kit piece and each column is a step in the pattern, so you tap cells to turn steps on.
- Tap the Step On/Off button under the grid to turn steps on and off. The Step Settings button switches the grid to Velocity, Note Repeat or Chance. Note Repeat makes snare rolls and double hits, and Chance sets how likely a lit step is to play.
- Tap the Dice button for a random pattern to start from.
- In the Inspector, tap Length to set the pattern length. In 4/4 it runs from 16 to 64 steps. Swing and playback modes such as Ping pong are in the Inspector too.
- Tap Record in the control bar to record the pattern into your song. It plays at the song’s tempo and shows up as a region in Tracks view. Tap Patterns, then Save, to keep the pattern for later.
Two other iPhone routes are worth knowing. On the Drums Touch Instrument, touching and holding a drum with two or more fingers plays a repeating pattern, and spreading or closing your fingers changes the speed. Live Loops works like a DJ grid where only one cell in a row plays at a time, which suits beats built from swapping parts. A song can have up to two Drummer tracks, the first section of a new song is 8 bars by default, and the whole song can run to 2000 bars.
To finish on a Mac over USB, share the song as a Project, tap Save to Files and save it in the GarageBand for iOS folder. Connect the iPhone to the Mac with a USB cable. In Finder, select the iPhone in the sidebar, click Files, expand GarageBand in the apps list and drag the song into the Finder, as Apple’s iPhone sharing guide describes. GarageBand projects don’t open on Windows, and a standard Mac project can’t go back to the iPhone, although the Mac can save a special iPhone-compatible version.
When should you move the beat to Logic Pro?
When you want a real step grid on the Mac or more drum tools. Logic Pro opens GarageBand projects directly, with no import or conversion, and Apple’s Logic Pro guide says this works for projects from GarageBand for Mac, iPad and iPhone. The Logic project keeps the GarageBand tempo and the patches translate one to one. The move is one way, because Logic Pro projects can’t open in GarageBand.
Inside Logic you get the Step Sequencer, which Apple describes as inspired by classic hardware step sequencers, with a row for each drum kit piece. Drum Machine Designer builds kits from single sounds, Live Loops carries over the cell grid idea, and our walkthroughs of making a beat in Logic Pro, 808 bass and lo-fi beats pick up where this one stops. If you’re still deciding whether the upgrade is worth it, our Logic Pro vs GarageBand comparison sets out the differences, and Logic Pro’s free trial lets you open your GarageBand beat in it first. More guides on writing and producing are in our Create Music hub.
GarageBand beat FAQ
Does GarageBand on Mac have a Beat Sequencer?
No. The Beat Sequencer is in GarageBand for iPhone and iPad. On a Mac, program a drum kit in the Piano Roll, use a Drummer track or drag in Apple Loops. Logic Pro adds a Step Sequencer if you want a grid on the Mac.
What BPM should a beat be in GarageBand?
Across seven producer-guide publishers, the median starting tempo is 75 bpm for lo-fi, 90 for boom bap, 140 for trap and 124 for house. Trap is written fast and felt in half time, so 140 feels like 70.
How do you make a beat faster in GarageBand?
Raise the tempo in the LCD: click the triangle on its right side, choose Beats & Project, then drag or type the new value. Apple Loops match the project tempo, so they speed up with it. For a change in part of the song, use Track > Show Tempo Track.
How do you make a beat drop in GarageBand?
Remove the kick and bass for the last bar or two before the hook, add a fill there if you’re using Drummer, and bring every part back on the first beat of the next section. Arrangement markers make those sections easy to see and move.
How do you make a beat fade out in GarageBand?
Choose Mix > Fade Out. GarageBand adds four volume points to the master track, from 10 seconds before the end of the last region to the end, and you can change the fade length by showing the master track, choosing Mix > Show Automation, selecting Volume and moving those points.
Can you finish a GarageBand beat in Logic Pro?
Yes. Logic Pro opens GarageBand projects from Mac, iPhone and iPad directly, keeps the tempo and translates the patches one to one. You can’t take the Logic project back into GarageBand afterwards.


